Sunday, June 24, 2012

Mutant Strawberry!

Today I visited Whole Foods for a quick trip to pick up some of the essentials. While washing up my strawberries I came across this guy!

Holy humongous batman! Almost the size of my whole palm!
I just had to compare it to the average sized strawberry out of my basket. Organic and all, this guy takes the cake,  measuring out at almost the length of a business card. 
I was almost too attached to eat him...almost! Yum. I guess the bigger the better. :)
Have you seen bigger? Let me know in the comments section. Give me a link to a picture if you've got them.

Saturday, June 23, 2012

Strike-A-Match Jar

Have you been looking for a classier, fresher way to transport your matches? I saw a similar tutorial floating around from the Burlap Bag, using sandpaper for the lid...it looked great, in theory. After testing it out I noticed that about 75% of the matches I tried to strike were not lighting, the sandpaper was just rubbing off the activator. Boo. So I've come up with an alternative, and you can use either Strike Anywhere or Strike-on-the-Box matches. Enjoy.

Using a mason jar gives it that cute look, also very practical for refills, and taking outdoors.
I started off by tracing the opening onto heavy cardstock, this will make the match striking surface more durable to pressure. You can use any cardboard you like - a cereal box would probably have worked just as well. Cut out the circle,  but don't cut out the hole quite yet. 

As for the sandpaper conundrum, my theory was - if it ain't broke, don't fix it -  Cutting the striking strips off the sides of the box work just as well as any old sandpaper, perhaps even better. Recycle! Align the strips on the circle. This is the part where it's ok to fudge a little, the jar rim will cover most of the curved edges so just get the straight edges of the strips lined up as best you can.   
Once you have all your pieces, use spray adhesive or double sided tape to attach your trimmed strips to the cardstock/cardboard circle. Use an X-acto or craft knife to cut out a small square about 1-2mm from the edge (1/4in). Make sure your rim doesn't cover it all up. 
Now fill your jar and screw your lid on tight, get ready for some summer BBQ fun.  The lid should last for a whole box of matches, if not grab a new one and refill.  The tops are easily changeable so your jar should last you a life time. 

Just in case you wanted to see it in action...here's my first attempt at making a GIF. Next time I'm just sticking with video. 

Sc8xaW on Make A Gif, Animated Gifs


Wednesday, May 9, 2012

Just Fob-ulous

I had been looking for a long time for a cute extendable fob to put my work key on. Something I could get to easily but still be able to wear on my apron without looking like I work in one of those hamster cage offices. 
Walking through the Roundtop Antique Sale and Flea Market I saw some of these large buttons attached to generic retractable key fobs and thought...I could do that! So I did. The following is a simple tutorial for making your own one of a kind fob. 
I started off with a size 60 (1.5" = 3.8cm) fabric covered button base, a retractable key fob (Office Max), some fabric for the button, and some knick knacks and beads for decoration.   

This set of buttons as with most come with a small metal attachment that would act as a latch to sew the button on with. You won't need this for this project. Pry the metal clasp out, the prongs on the top portion of the button are VERY sharp, so careful!

This shows the metal clasp once removed. It's like a spring, but I would suggest using pliers instead of fingers for this part. 

The buttons will come with a pre-sized pattern on the cardboard portion. Cut a square of fabric that will fit when doubled up on the pattern. Place the pattern on the fold and cut around. 

You will end up with a circle of fabric that should fit nicely over the top of the button  (the rounded portion).

Wrap the fabric tightly over the top of the button, pressing the fabric onto the prongs on the bottom side. This is the best time to work out any folds and creases that come up when gathering. It will be near impossible to fix them once the bottom portion is attached. 

Your top and edges should be smooth and flat. 

The larger buttons are much easier to assemble than smaller ones you might use for earrings or jewelry. Press the upper and lower portions together to fix the fabric into place. That small slit is where that clasp you removed would have come through. 

Attached the fob with glue to the back of the button. I would suggest something strong like E8000 (which you can easily get at Michaels).  More than likely you will be clipping this in a prime counter smacking area. So it can't hurt to have a strong glue. 

Now attach your decorations as you please. I did two straight strands of beads. Nothing fancy, but I think it would look cute with a charm or accent bead at the bottom. (Yeah...above is what happens when you don't work with a bead mat, or paper. Darn you berber carpet!)

And here is the final result! Quite fetching if you ask me. 

Sunday, April 8, 2012

Easter Bunny for Big Kids

Easter's Here! You know what that means right? BUNNIES, and puppies dressed as bunnies. 


After 25 dedicated years of being the Easter Bunny for me. I wanted to give back a little bunny love to my parents. That's where this sophisticated easter basket comes into play. After scouring World Market, through some of the best basket fillers out there, I was able to throw together this little number. 


No neon or plastic eggs, just pale, earthy, Eastery colors. 


Included:
Fat Tire Beer
• Pinot Grigio
• Tiramisu Dark Chocolate Bar 
• Glass Bead Wine Identifiers
• Southwest and Mediterranean Mixed Nuts
• Werthers's Originals Butterscotch Hard Candies
• Hazelnut and Peanut Butter
• Maple Syrup
• Indonesian Teak Scented Candle
• Asst. Ritter Chocolates


Easter baskets are cool just by themselves but to let the receiver really know you care, get those crafty juices flowing. I simply cut out a cute little bunny silhouette. Sized down from this. Right click and save the Pin Image, it's impossible to find if you follow their link.
Needless to say they enjoyed their basket of goodies. 
I also decided to flex my baking skills. Well sort of... baking from a mix counts right? I found this carrot spice scone mix from Sticky Fingers Bakery. They came out very soft, not what I'm used to for scones, but they tasted delicious. 
Carrot Spice Scone Mix from Sticky Fingers Bakery can be found at World Market. Lots of great seasonal options offered too. 
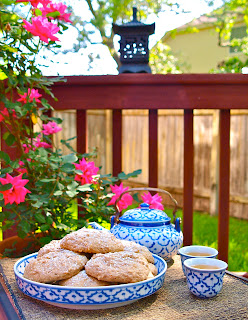
It's all about presentation, and you can't have scones without tea. I made a nice Jasmine green tea for this mornings delectables. Tea and scones were served on the back patio this Easter morning. Little birds and light breezes. Ahh this is my kind of Easter. 


 Don't they just look scrumptious! Who could resist these powered sugar dusted scones. Yum.
 It was a perfect Easter morning. Oh, and yes, even after 25 years, there were still chocolate eggs hidden around the house for me to find when I came over. Aren't my parents just the cutest. 
Happy Easter Everyone. 

Thursday, October 6, 2011

October (aka Halloween Month) is finally here, and just about anyone who knows me can tell you that I would not be caught dead or alive in a haunted house. But this Flickr steam kinda makes me want to change my mind. 
                                                                                                                 

Nightmare's Fear Factory photostream is priceless. Take a look at some of the hilarious photos of patrons caught in the fear of things. I especially love the "manly" men screaming their little heads off. Teehee. Check it out.


Now that Halloween is just around the corner, stay tuned for updates on Halloween crafts and costume ides. 


Monday, April 4, 2011

SweetHearts

What's better than biting into a sweet treat on Valentine's Day. As a rule I try and bake and or make something for just about every holiday. Helps spread the joy and who doesn't love a cupcake? 


While cruising the internet for fabulous valentine ideas I came across this gem from Bake it in a Cake. What a fantastic surprise for those you love most. Just make sure you have them facing the right way. 


Bake It in a CakeBake a Heart in a Cake


Now I have to say I tried. Diligently. But with limited time and certain unforeseeable circumstances, my cupcakes did not look like this perfectly sweet rendition above. Mine just ended up looking like white cake pots with little pink buds emerging. Needless to say, not perfect. So instead I did what I could with the two dozen fail-cakes I could.


Decoration, it's all about the cover up when it comes to failing. Making something beautiful out of something that just isn't what you expected. 

White chocolate was my cure. With these fantastic neon food colors from McCormick. 

Hearts and swirlys make any cupcake whimsical. You can pipe them out on parchment paper, or wax paper. Attach two pieces together with a small dab of chocolate.

Late night cake decorating gone right :) I was so please to be able to pull this off after my frustrating afternoon of baking.

Three colors, two heart sizes, swirlys...combinations galore.

Some cupcakes for my kin as well, gotta please the family...can you tell I was  running out of icing?
Well not everything in life turns out the way you plan...especially when you start at 7pm and need cupcakes for work in the morning. Baking is not something you can rush, but I have to say the results still got the Oohs and Ahhs I was hoping for. 


Try it for yourselves. I would suggest reading the comments on the Bake It in a Cake article, there are a lot of helpful suggestions on how to tackle some of the mistakes I made. 

Wednesday, March 23, 2011

Love Created.

Ok Ok I know I'm about a month late to be posting things about Valentine's Day, but it has been a chaotic month. I'll catch up within the next week or two. Promise.

This Valentine's Day I really wanted to use my hoards of craft and paper supplies to create something beautiful that my friends and family would love.

This is what I decided on.

The pattern for this card came from Craftzine
I started off printing out the PDF file from the Craftzine website....but unfortunately the template has unsightly black dotted lines that will show up no matter how you fold it. Unless you are so precise in cutting them all out. I decided to use my first cut out as a template, and then trace the design onto my final paper choice (cut inside the lines to get a good fit when the piece is folded. 

After a little wrangling, all the pieces finally came together into a sweet silhouette.  
The template is simple and easy to fold...you will need a bone folder or something like it to get the clean edges. I opted for using a slim double sided tape to hold the piece together, glue just doesn't dry fast enough. The card has a great silhouette structure to it, a little forest of love.

Just adding a cute $1 stamp from Michael's makes the an adorable card cover uber-delightfull. 
I added an inscription on the backside of the card...I would suggest doing this before folding. Yeah. I learned that the hard way. 

I loved the idea of using other colors besides red or pink, this one went to my nature loving coworker. Very appropriate green casing and of course the forest hidden inside.
The little peak-through heart window makes this valentine all the more unique.
Now you have a fantastic homemade valentine that anyone would be overjoyed to receive. Check out the full article on Craftzine for ideas on what your recipients could do with this little jem... like frame it?